redump
3 min read
- cli
- restore
- redmine
- dump
- migrate
![]()
REDUMP is a tool to migrate data in your Redmine without admin accounts.
You can use the API to retrieve tickets in Redmine, save them in JSON format, and migrate them to another Redmine.
Table of Contents
Background
When you migrate a Redmine project to another Redmine, you have to dump the DB that is used behind the scenes, which is a job that only a server administrator can do.
However, many Redmine administrators don't like to do that and won't do it.
In that case, users can move the necessary tickets manually, but this is not practical when the number of issue tickets or files is too many.
If the project can use the Redmine API, I thought I could use the Redmine API to achieve the same thing.
This is because I try to make this tool.
Features
- You can save Redmine Isssues in JSON format with attachments.
- You can migrate issues to other Redmine.
- You can create a list of users from an Issue without administrative privileges.
- Access via HTTP Proxy is supported.
Install
Quick Install
Manual Install
System Requirements
- Go(v1.12 and more)
This project is implemented using Go, so you will need to install Go beforehand.
Build
When building success, artifacts exists main(.exe) in root directory.
make buildRun
If you want to run the code directly, use the run command, which allows you to specify options in the ARGS options.
make run ARGS="dump"Usage
Precondition
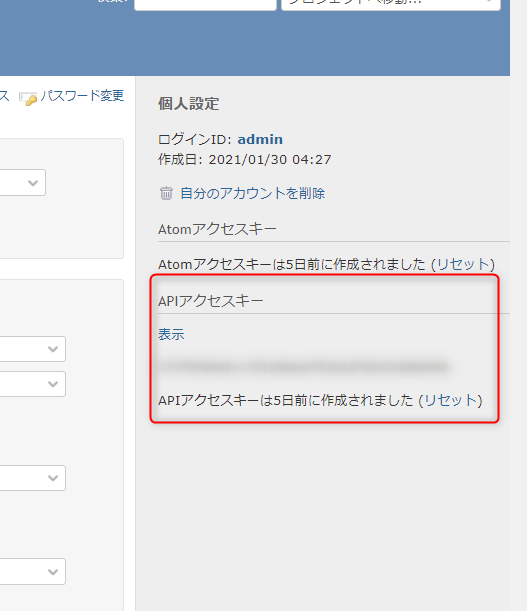
First, you need to make sure that you can use Redmine API for both Redmine source and destination. (need admin account!)
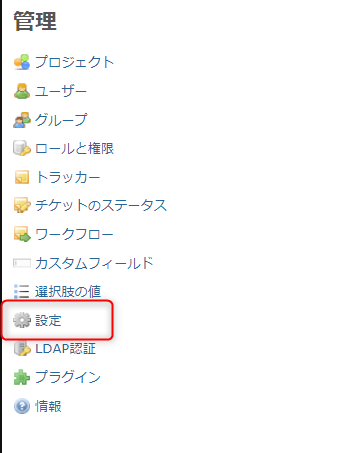
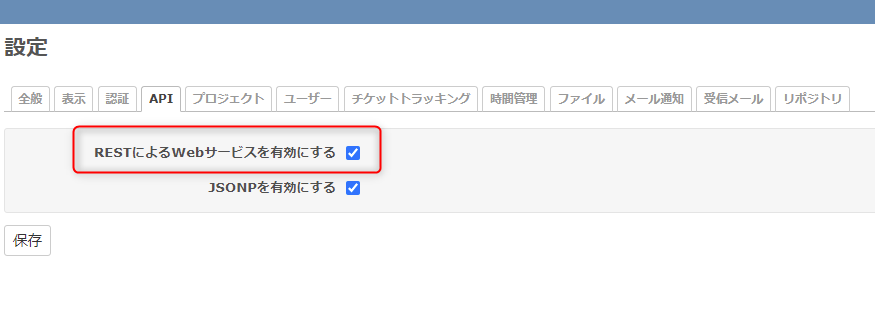
Then, you can get an API key from your account settings.
Second, put Redmine's server information in TOML format in the config.toml file.
We have prepared config.toml.example as a template, so we will copy that first.
[server] # source server
url = "https://example.com"
key = "xxxxx" # API Key
project_id = 1 # if you want to choose several project's issues
sleep = 3000 # request sleep millisecond
timeout = 10000 # timeout(millisecond) if no response over that time
proxy_url = "http://127.0.0.1:8080" # If you use http proxy, set proxy url, port, user/pass

[new_server] # new server
url = "https://blog.tubone-project24.xyz"
key = "xxxxx" # API Key
project_id = 1 # if you want to choose several project's issues
sleep = 3000 # request sleep millisecond
timeout = 10000 # timeout(millisecond) if no response over that time
proxy_url = "http://127.0.0.1:8080" # If you use http proxy, set proxy url, port, user/pass
If you have created similar project, tracker, status, priority, user, and custom fields in the destination, you can create issue tickets correctly on the migration server side by specifying the ID mapping.
[[mappings]]
  name = "project_id"
  [[mappings.values]]
    old = 7
    new = 9
  [[mappings.values]]
    old = 11
    new = 2
How to use
Redump is a command line tool, so it consists of a few commands and options.
Usage:
  redump migrate [-i|--issue <number>] [-s|--silent]
  redump list
  redump dump [-c|--concurrency] [-i|--issue <number>]
  redump restore [-i|--issue <number>] [-s|--silent]
  redump clear [-o|--old]
  redump -h|--help
  redump --version

Options:
  -h --help                  Show this screen.
  -c --concurrency           Concurrency Request Danger!
  -i --issue                 Specify Issues
  -s --silent                Silent mode (never assign to issue)
  -o --old                   Old Server
  --version                  Show version.
For Example, if you want to copy issues from old Redmine to new Redmine, you can use migrate command.
$ redump migrateIt is also possible to focus only on specific issues.
set -i option and issues number.
$ redmup migrate -i 133If you are migrating a large number of issue tickets, it is recommended to use silent mode.
Because notifications may be sent if you assign them to a person in charge.
$ redump migrate -sDocument
More information? look at pkg.go.dev